Integrated Adapter
Info
The test management interfaces are undergoing a rework. Please contact the support if you would like to use a new test management system.
Information about the interface currently under development can be found at User test management adapter.
Configuration
Before the first use, the interface to the test management system needs to be configured. The settings page is reachable via .
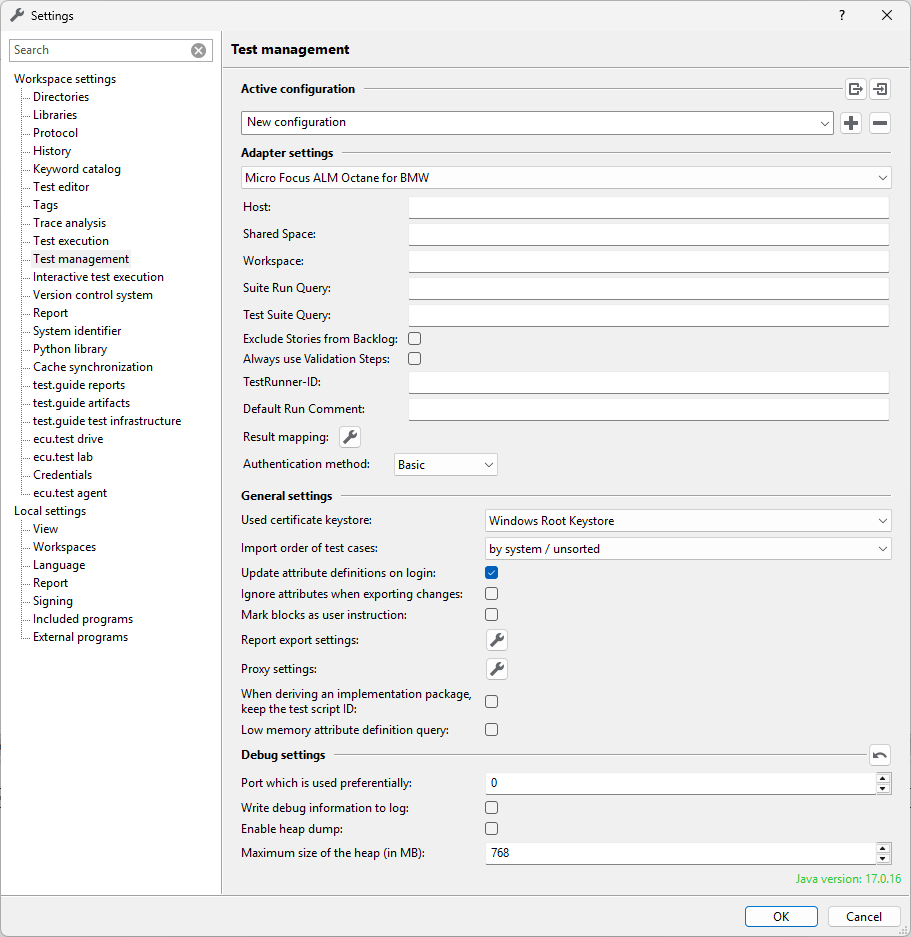
Here you can choose, which test management system to use, as well as adjust related configuration settings. Furthermore the actual java version will be displayed here.
Common Settings
Those settings are independent from the configured test management system.
- Used Certificate Trust Store
Used to verify trusted certificates. It can be either the user-specific or system-wide Windows keystore, or the one brought by the Java Runtime Environment.
- Import order of test cases
Defines the import order for test cases of a test suite when importing a project.
- Update attribute definitions on login
Determines if the definitions of package and project attributes have to be synced to test management system at each login. The
pkgattr.specandprjattr.specworkspace files will then be updated. See also Working with attributes.
- Ignore attributes when exporting changes
If marked the “Export Changes” action will not export ecu.test Attributes.
- Mark blocks as user instruction
Makes it possible to interpret block test steps, which have been generated at package import, as user instructions, when executed in interactive mode.
- Report export settings
Defines the default configuration for the report exports. Those settings can be set for each export individually (Exporting test reports into the test management system).
- Proxy settings
Possibility to configure a proxy connection.
- Low memory definition query.
Queries the attribute definitions sequentially, which takes longer, but does not require as much memory.
Debug settings
- Port which is used preferentially
The port specified here is attempted to be used. If this is not available, the dynamic port range (49152 to 65535) is used.
- Write debug information to log.
Additional information is written to the log file. Slows down the interactions with the respective test management system.
- Enable heap dump
Creates a heap dump when the Java process crashes.
- Maximum size of the heap (in MB)
Sets the upper limit for the memory consumption of the Java process.
System specific settings
Those setting depend on the test management system and can vary based on the selection. For example the access URL of the test management system host must be defined here often.
Additionally the domain specific mapping of ecu.test results to the available results should be defined within the “Result mapping” dialog.
Info
For each supported test management system ecu.test provides a default mapping for all the common results.
Use of test management system specific results
During report export to test management the ecu.test results will be mapped according to the defined mapping. In case of multiple assignments of test management results to a single ecu.test result the most upper result will be preferred.
Furthermore it is possible to explicitly choose a test management result when reevaluating a test report. Such an assignment will be used instead of the default result mapping while report export.
Info
It is possible to map the same test management result to several ecu.test results at the same time, e.g. “Cancelled HW = ERROR” and “Cancelled HW = INCONCLUSIVE”. If so, only the worst ecu.test result of the multiple assigned test management result is available in the list of Evaluations when reevaluating a test report. With ERROR < FAILED < INCONCLUSIVE < NONE < SUCCESS, where < means “worse than” in the given example only Cancelled HW (ERROR) would be selectable for revaluation.
Customization of the test management connection
If the settings mentioned in the previous sections are not sufficient, it is possible to customize the test management connection itself via user-defined scripts (hooks). Instead of using the default implementation, you can use your own hooks to change the behavior.
It is recommended to use the default implementation from
<ecu.test-installation directory>/Templates/DefaultData/UserPyModules/AlmHooks
for reference. The custom version of the hook must be stored in the workspace below
UserPyModules so that ecu.test recognizes (Ctrl+Shift+R if necessary)
and executes them. It is also possible to store several hooks with different behavior, which
ecu.test would execute sequentially.
The interfaces to be fulfilled are described under
<ecu.test-installation directory>/Templates/DefaultData/UserPyModules/AlmHooks/api.
The behavior of the following functionalities can be customized:
- TestSuite-Import
Interface
<ecu.test-installation directory>/Templates/DefaultData/UserPyModules/AlmHooks/api/interface/TestSuiteImportHook.py
- TestScript-Import
Interface
<ecu.test-installation directory>/Templates/DefaultData/UserPyModules/AlmHooks/api/interface/TestScriptImportHook.py
- TestScript-Export
Interface
<ecu.test-installation directory>/Templates/DefaultData/UserPyModules/AlmHooks/api/interface/TestScriptExportHook.py
- TestScript-Attributes-Export
Interface
<ecu.test-installation directory>/Templates/DefaultData/UserPyModules/AlmHooks/api/interface/TestScriptAttributesExportHook.py
Working with attributes
Packages and projects in ecu.test can be adorned with attributes. Many test management systems likewise allow to attach attributes to test scripts and test suites. ecu.test can adopt attribute definitions from the test management system. In order to achieve this, click in the context menu of any folder in the workspace explorer.
As soon as this process is completed, all packages and projects allow you to set values for those attributes that are supported by the respective test management system. If an attribute provides a choice of predetermined values, this choice is also available in ecu.test. Additionally, so-called mandatory attributes, which are required to have a value, are marked.
In the test management settings you can additionally configure ecu.test to update the attribute definitions automatically upon each login into the test management system.
For packages and projects, which are already linked to the test management system, you can choose to only import or export attributes. Functions to that effect can be found in the context menu of the respective files. The feature is described in more detail in the sections working with packages and working with projects.
Working with packages
ecu.test can export packages into the respective test management system as test scripts. Vice versa, test scripts from the test management system can be imported as (abstract, still requiring implementation with concrete test steps) packages. Additionally, changes to packages can be applied to already exported test scripts.
A package that has already been exported into the test management system, or has been imported from there, features a test script ID in the Common section of the Properties tab.
Via the menu item you can sever the link between a package and the test management system. This is e.g. useful if a new package was created by copying from a package that was already linked to the test management. All test management relevant information will be removed from the package.
Via the menu item you can compare an already linked package with its corresponding test script in the test management system. This can be used to make sure that Export changes does not override any information on the test management system unseen.
Exporting packages into the test management system
To export a package to the test management system, right-click it in the workspace explorer and select .
You can also export several packages at once by either selecting several packages, or right-clicking one or more folders. The menu item is then called Export packages. Likewise, the export can be triggered via .
The export is only available for unsynchronized packages. Changes of already linked packages can only be committed via Export changes.
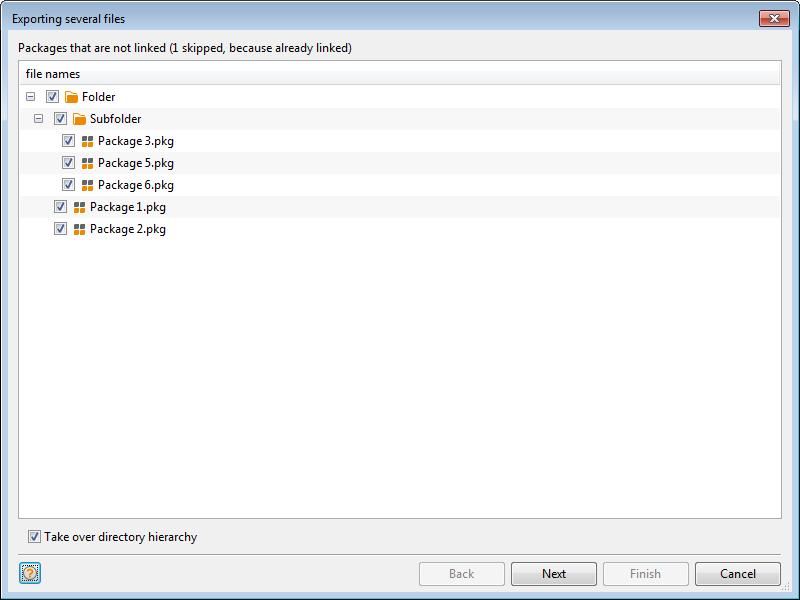
If you have chosen several packages or a folder, initially a dialog is shown where you can choose which packages to export on the first page. This page will be skipped automatically if only files were selected. To have a look at the selection or edit it, you can use the Back button to get to the first page. The displayed tree equals the structure in the file system. The packages that are shown beneath the directories are those that are not yet linked to the test management system and therefore can be exported.
The option Take over directory hierarchy defines whether the directory structure is taken over to the test management system.
Info
IMPORTANT: If one or more folders are exported, the export always creates subfolders beneath the target directory (if they do not already exist). For example if you export folder “A” in a directory “TMS”, then the folder “A” will be created beneath “TMS” and in this folder you can find all further artifacts and directories.
If the option is not activated, the packages will be exported flatly in the directory that is chosen on the next dialog page. If the used test management system does not support directory hierarchies a note is displayed instead of the option and the packages also will be exported flatly.
Info
If the flat export of files leads to name collision, because files with the same name from several source folders shall be exported to one target directory in the test management system, a dialog is shown that asks you to revise the source file selection.
On the second page of the dialog you can choose the target directory in the test management system.
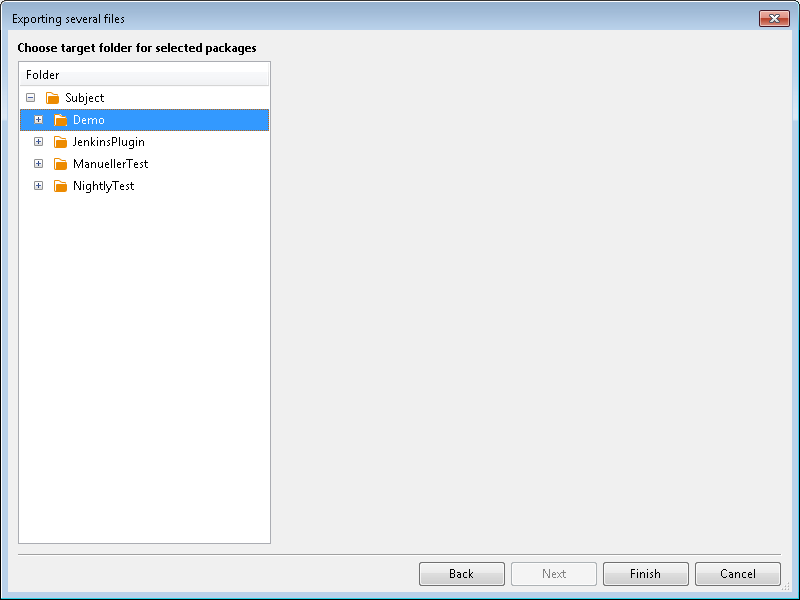
If you have chosen only a single package, the target folder selection appears right away.
Here you can choose the location in the test management system that the packages should be exported to. If needed, you can right-click to create subfolders (if supported by the test management system).
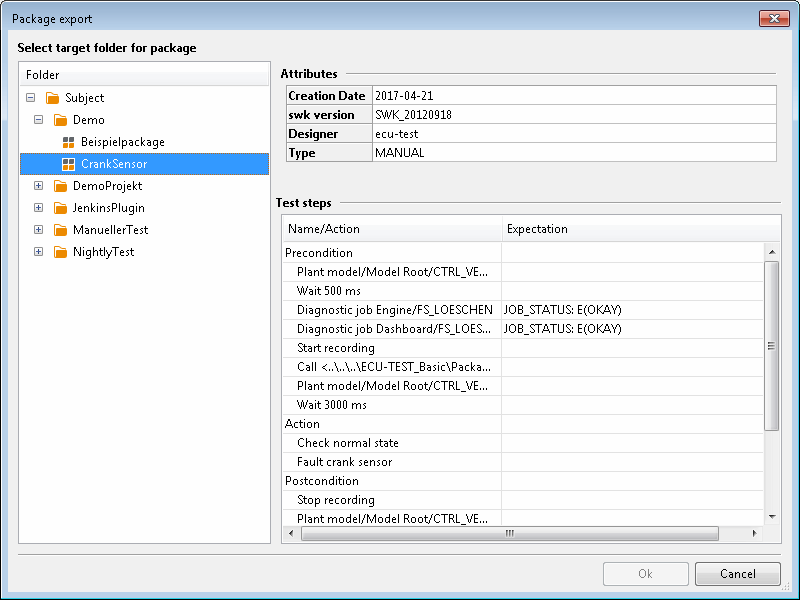
If you select an existing test script, ecu.test shows its attributes and test steps in the right half of the dialog. After clicking finish or OK, test scripts that correspond to the chosen packages will be created in the chosen folder. Furthermore, the packages will be linked to these test scripts.
Mapping of package contents
When a package is exported, a corresponding test script is created or updated in the test management system. The test script bears the name and attributes of the package, and describes what variables (including in and out parameters) the packages has. As test steps, it contains textual representations of the test steps of the second block level of the Test case tab of the package.
If the package contains one or more trace analyses, an additional test step is created, which enumerates the names and descriptions of all trace analyses, separated by line breaks.
The second level was chosen in order to allow a first-level grouping into precondition (for checking/establishing preconditions), action (for the test procedure proper) and postcondition (for establishing postconditions or a well-defined follow-up state).
A package can be exported only if the following conditions are fulfilled:
all attributes comply to the requirements prescribed by the test management system or its configuration
e.g. a maximum length can be specified
maybe only values from a given list are permissible
there can be restrictions on the data type (only numeric values, etc.)
so-called required attributes must not be left empty
all variables are of a supported type: String, Numeric, Boolean or Undefined
all test steps on the second block level are representable as text by the test management interface
representable test step types are:
Blocks
Wait test steps
Read test steps with supported (i.e. not manual) expectations of type Numeric or String
However, string expectations may only be identical or contained in (list) (then, the first list entry is used) and without case sensitivity
Pay attention: Python default functions (built-ins) will be interpreted as a reference to a variable inside of an expectation
Write test steps
Calls of subpackages
EDIABAS diagnostic calls
Wrong/missing attributes as well as unsupported variable types cause the export of the package to be cancelled. Unsupported test steps, in contrast, are skipped.
Info
ecu.test offers a facility to edit the attributes of several packages at once. Missing values for required attributes or inadmissible attribute values can thus be fixed without having to open each affected package individually.
Info
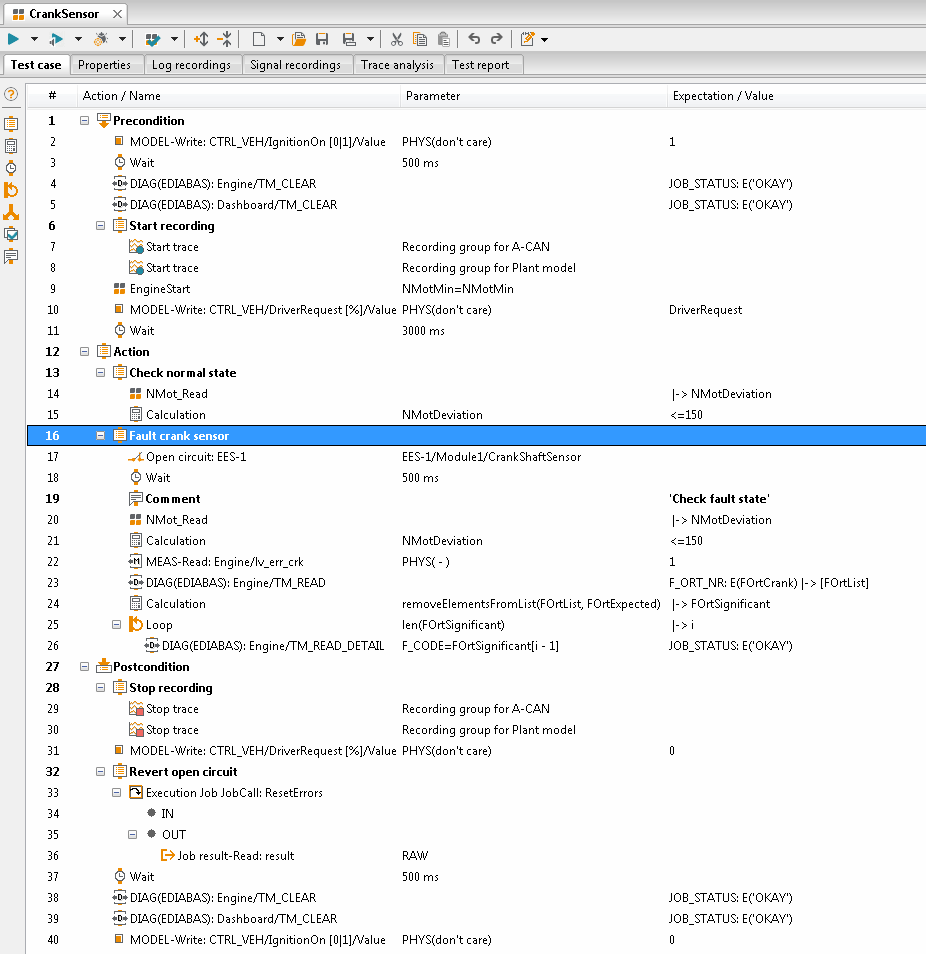
Packages with unsupported test steps on the second block level can easily be made exportable by encapsulating the unsupported test steps in newly created blocks. The blocks’ action/name and expectation should be phrased to express the intent of the contained test step(s). Then, these texts will be exported into the test management system.
Example
In the following package “CrankSensor” the unsupported test steps (e.g. Start Trace, Stop Trace and Execution JobCall) are encapsulated in blocks, therefore the package can be exported to test management.
Importing packages from the test management system
In order to import a package from test management system, right-click that folder in the workspace explorer that you want to import the package into, and choose . This option is not available if several folders are selected.
In the dialog which now opens, you can choose a test script for import. Whenever you select a test script, the right part of the window shows its attributes and test steps. Alternatively test scripts also can be imported by already known id’s.
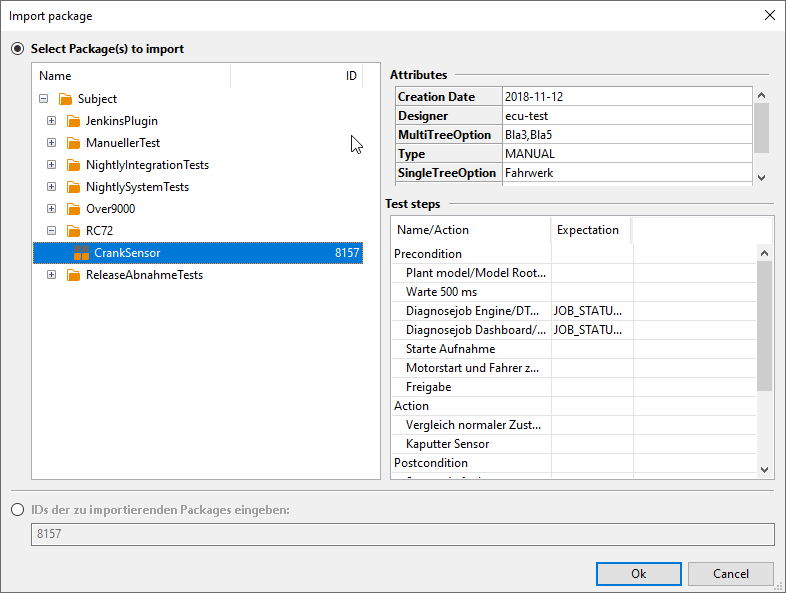
When you click OK, a package is created. It bears the name, attributes and variables of the chosen test script.
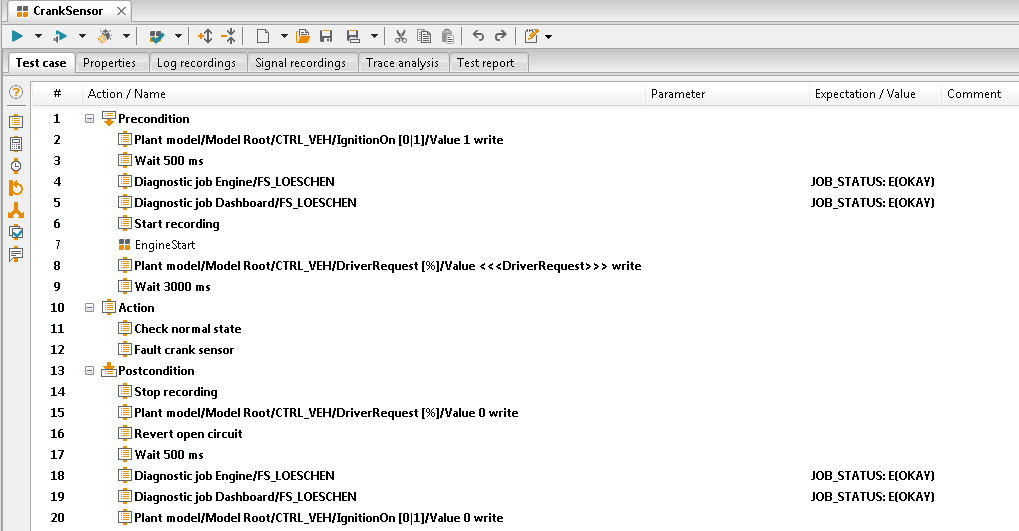
For every test step enumerated in the test script, in the package a block test step is created with the respective action and/or expectation texts. These blocks are places in top-level blocks “Precondition”, “Action” and “Postcondition” if applicable. Only calls to subpackages will be imported as such.
The test step that stands for trace analyses is not imported as a block.
Info
The packages obtained in this way contain only a textual test procedure specification. To turn them into full-fledged (automated) test scripts, the automatically created empty blocks need to be filled with implementations.
Example
The package “CrankSensor” shown further up looks like this after it has been exported and then imported into a new folder:
You can also choose a folder. Then, a new subfolder with the name of the chosen folder will be created in the selected workspace folder, and all test scripts and subfolders will be imported recursively.
Committing package changes to the test management system
Changes made to a package, which has previously been exported into the test management system, can be passed on to the test management system by using the context menu entry on a package . The same function can be triggered for an entire folder of packages via . Then, the update is performed without any further confirmation.
In doing so, the attributes of the test script are overwritten with those of the package. Deleted and added variables will also be deleted from and added to the test script. Renamed variables are considered to be deleted and created under the new name. A step of the test script will only be deleted if the corresponding test step on the second block level of the package is no longer present. Changes to existing test steps, as well as changes to their order, are transferred into the test management system in a way which re-uses the existing steps of the test script, in order to leave references to these test steps within the test management system (e.g. in test logs) intact.
Info
The reuse of existing test steps and other package parts is not supported by all test management systems. In this case this objects will be always overridden.
Importing and exporting attributes
In order to transfer only changes of attributes of a package, which is linked to the test management system, to the corresponding test script, you can choose the option Export attributes in the package’s context menu. Conversely, in order to transfer attribute changes from the linked test script to the package, you can choose Import attributes.
The export or import is carried out without user interaction (apart from requesting confirmation for closing the affected packages and/or login).
Both functions are also available when multiple packages are selected, as well as in the context menu of a folder (then labelled Import/Export package attributes).
Working with projects
ecu.test can export projects into the respective test management system. Vice versa, you can import test suites from the test management system as projects. Additionally, you can link projects to test suites even without importing or exporting them. Upon a later export of test reports, this link enables a matching of test logs to test suites. When importing or exporting a project, the link is established implicitly.
In parameter sets, this link is shown as test case ID on the Test management tab of the parameter set dialog. The link of the project itself is only shown as a tool tip in the workspace explorer. Package calls without a parameter set do not show their link status in ecu.test.
Via the menu item you can sever a project’s link to the test management. This is useful e.g. if a new project was created by copying an already linked project. All test management relevant information will be removed from the project.
Exporting projects into the test management system
In order to export a project into test management, right-click it in the workspace explorer and choose . You can also export several projects at once either by selecting multiple projects or right-clicking one or more folders. Then menu item is then called Export projects. Likewise, the export can be triggered via .
If you have chosen several projects or a folder, initially a dialog is shown where you can choose which projects to export on the first page. This page will be skipped automatically if only files were selected. To have a look at the selection or edit it, you can use the Back button to get to the first page. The displayed tree equals the structure in the file system. The projects that are shown beneath the directories are those that are not yet linked to the test management system and therefore can be exported.
The option Take over directory hierarchy defines whether the directory structure is taken over to the test management system.
Important
If one or more folders are exported, the export always creates subfolders beneath the target directory (if they do not already exist). For example if you export folder “A” in a directory “TMS”, then the folder “A” will be created beneath “TMS” and in this folder you can find all further artifacts and directories.
If the option is not activated, the projects will be exported flatly in the directory that is chosen on the next dialog page. If the used test management system does not support directory hierarchies a note is displayed instead of the option and the projects also will be exported flatly.
Info
If the flat export of files leads to name collision, because files with the same name from several source folders shall be exported to one target directory in the test management system, a dialog is shown that asks you to revise the source file selection.
On the second page of the dialog you can choose the target directory in the test management system.
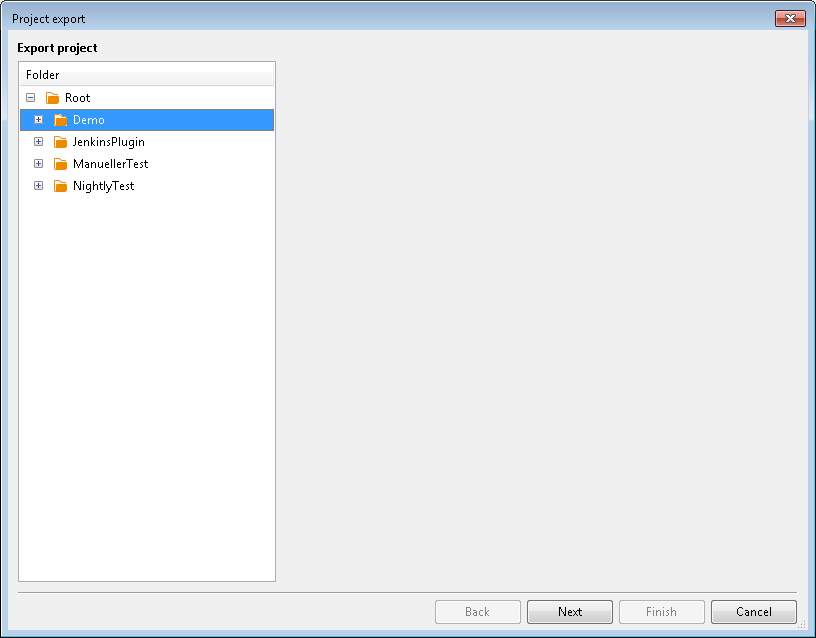
Here you can choose the location in the test management system that the projects should be exported to. If needed, you can right-click to create subfolders. After clicking Finish, test suites that correspond to the chosen projects will be created in the chosen folder. The projects and the contained package calls and parameter sets will be linked to the corresponding test suites and test cases in the process.
Mapping of project contents to test management
Upon exporting a project, a test suite is created in the test management system. The test suite bears the name and attributes of the project, and contains references to the test scripts, which correspond to the packages called by the project, as test cases. Test cases that correspond to parameter sets additionally contain the parameter assignment.
Configuration changes, generators and subproject calls as well as the folder structure of the project are not reflected in the test suite. Nor are alternative mappings and assignments of global constants in the parameter sets, nor special settings like separate subproject execution or repetition on error.
A project can only be exported if it fulfills the following constraints:
all attributes comply to the requirements prescribed by the test management system or its configuration
e.g. a maximum length can be specified
maybe only values from a given list are permissible
there can be restrictions on the data type (only numeric values, etc.)
so-called required attributes must not be left empty
packages called by the project are already linked to a test script in the test management system.
Info
If some or all packages are not yet linked to the test management, the project export dialog offers a chance to export those packages before exporting the project.
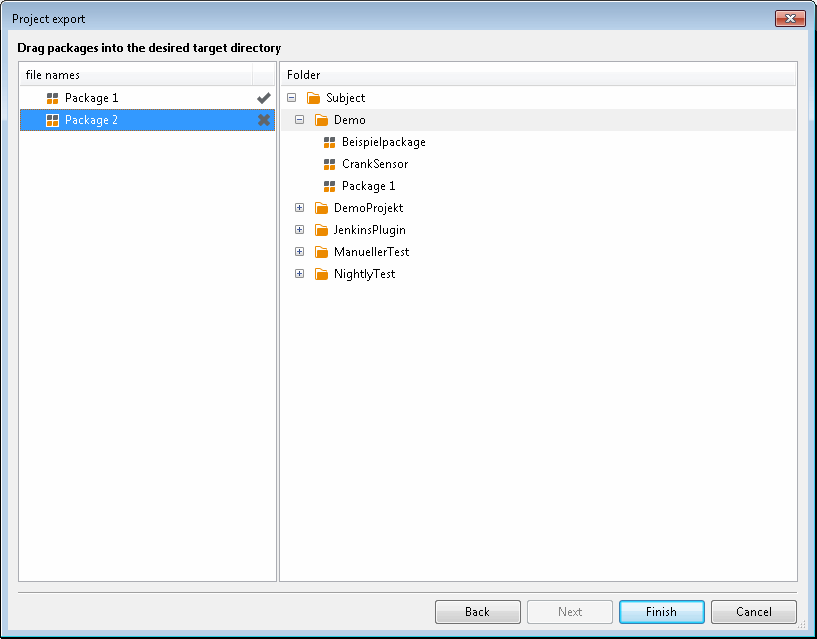
In order to designate a package for export, drag it with your mouse onto the desired target folder. After clicking Finish first the packages and then the project will be exported.
However, if you do not want to export the packages, but rather link them to existing test scripts, you have to abort the export of the project, and establish the links separately before re-starting the export of the project.
Importing projects from the test management system
In order to import a project from the test management system, right-click that folder in the workspace explorer that you want to import the project into, and choose . This option is not available if several folders are selected.
Alternatively you can start the import via .
In the dialog which now opens, you can choose a test suite in the test management system. Whenever you select a test suite, the right part of the window shows its attributes and test cases (with name, ID and parameter assignments) as a preview. Alternatively test suites also can be imported by already known id’s.
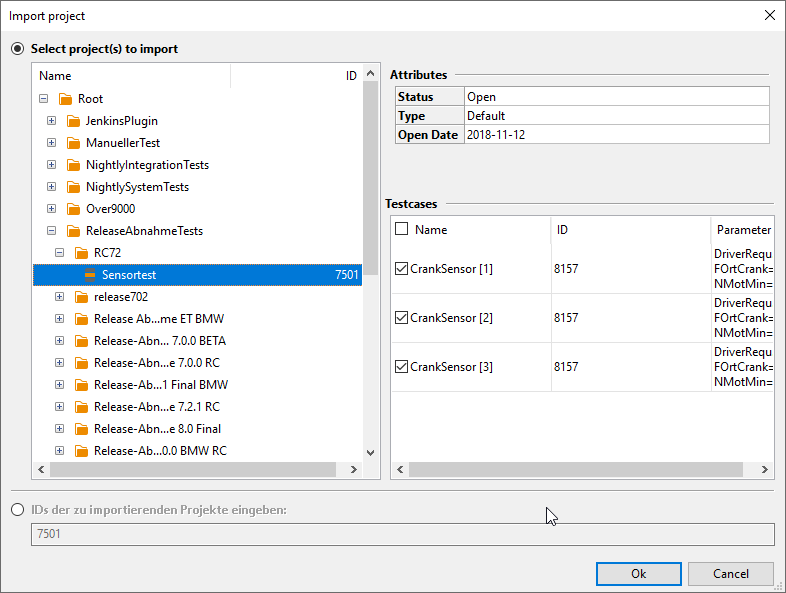
After clicking OK a project is created. It bears the name and attributes of the test suite. For each test case contained in the test suite, ecu.test creates a package call in the project, which points to the package that is linked to the respective test script. If the test case contains parameter assignments, a corresponding parameter set is attached to the project call.
Info
For each test case a separate package call with (or without) a single parameter set is created, despite the fact that they might refer to the same test script – even if the test suite was originally created by exporting a project where one package call had several parameter sets.
Info
After selecting the test suite it is possible to choose a subset from the available test cases for import. You simply have to uncheck the not required test cases in the preview.
In order to be able to import a test suite as a project, the test scripts referenced by its test cases must already exist as packages (i.e. either the test scripts must have been imported and packages been created from them, or they must have been created by exporting packages). If this is not the case, ecu.test offers you to import the test scripts as packages before importing the project.
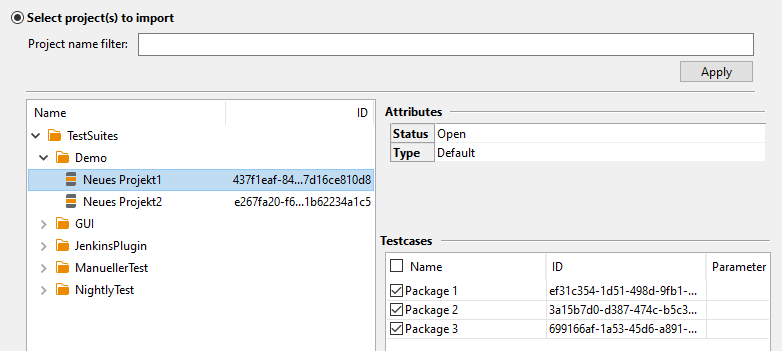
You can also choose a folder. Then, a new subfolder with the name of the chosen folder will be created in the selected workspace folder, and all test suites and subfolders will be imported recursively. However, automatically importing missing packages is not possible when importing a whole folder.
Linking and synchronizing projects
In order to link an existing project to an existing test suite, right-click it in the workspace explorer and choose .
In the dialog that now appears, choose a test suite to link the project to.
By clicking Synchronize you reach the second page of the dialog, where a name-based assignment of parameter sets and unparameterized package calls of the project to test cases of the test suite is displayed. Parameter sets and package calls that could not be matched to a test case, as well as test cases that could not be matched to a parameter set or package call, are also displayed.
After clicking Finish the link to the test suite and to the individual test cases is recorded in the project file.
In order to reconcile a project, which is already linked to a test suite, with that schedule, you can instead choose . This is especially useful if the project or the test suite has been changed.
Importing and exporting attributes
In order to transfer only changes of attributes of a project, which is linked to the test management system, to the corresponding test suite, you can choose the option Export attributes in the project’s context menu. Conversely, in order to transfer attribute changes from the linked test suite to the project, you can choose Import attributes.
The export or import is carried out without user interaction (apart from requesting confirmation for closing the affected projects and/or login).
Both functions are also available when multiple projects are selected, as well as in the context menu of a folder (then labelled Import/Export project attributes).
Working with test reports
ecu.test can export test reports as test logs into the test management system, if they originate from a project, which was already linked to the test management system when it was executed.
Exporting test reports into the test management system
In order to export a test report into the test management system, click the button
Export results to test management  in the tool bar of the Report viewer.
Alternatively you can call the report export from the ecu.test main program via
. Using this way it is possible
to select a report file (*.trf) or a directory, where also all sub directories are
searched for report files.
In the tree that appears in the lower part of the dialog, you can choose which of the package runs contained in this test report shall be exported into the test management system. Naturally, only those runs whose package calls or parameter sets are linked to a test case can be selected for export. If a directory was selected all reports from all sub directories that were found are listed and selectable.
Info
Pay attention: in case of large report folders the loading of report data may take some time!

Info
The selected reports have to be reports from a project execution. Furthermore only elements that were already linked to the test management can be exported. Unlinked elements are displayed gray and italic and cannot be selected.
Reports that have no valid elements to export are also displayed gray and italic and are initially collapsed.
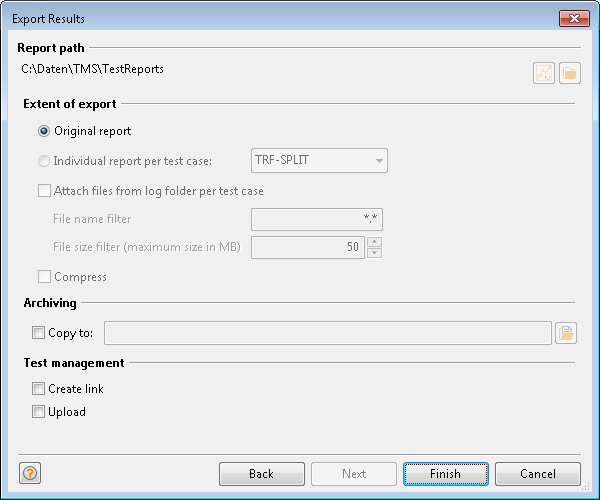
On the next page, which you reach by clicking Next, you can choose what artifacts to export to the test management system along with the report:
You can choose between the original TRF file and the output of a report document generator.
The generator TRF-Split allows to extract a separate TRF file for each package run from the common project report TRF file.
The other report document generators create formats that are readable outside ecu.test, e.g. HTML.
You can choose to include additional files from the report folder (e.g. logs, signal recordings)
You can choose whether or not to compress the files
You can choose to copy the files to a specific location (e.g. a shared network drive)
You can choose whether to attach the files themselves to the test log, and whether to add a link to the files to the test log, the latter of which is especially advantageous when the files are being copied to a shared network drive.
Info
The directory structure from the report directory is taken over if you archive files. If a report file is exported the parent directory will be created additionally on the file system.
Defaults for these settings can be defined in the Test management settings.
After you click Finish, test logs are created in the test management system, one for each package run. The test log points to the executed test case and the test suite. It contains the overall evaluation of the package run as well as all possible revaluation comments from the test report.
For each executed test step of the second block level (corresponding to the steps of the test script) an entry in the test log is created with the following information (if supported by the test management system):
Pointer to the test step
Evaluation
Timestamp
Text of the test step
Actual value
Expectation
Depending on the type of the test step, some of these fields may remain empty.
The chosen artifacts are attached to the test log. If a generator was chosen, it will be executed before creation of the test logs. If the generator produces not just a single file, its output folder will be zipped, and the zip file used.