Report viewer
The report viewer is used to examine and interpret test reports.
It is opened automatically after the execution of a package (Package report) or project (Project report).
Reports of past executions can be opened via
or double click on a *.trf file in the Windows explorer. By clicking
the Message window will be opened and shows the
current messages.
Project report
A project report is created when executing a project (play button in project editor).

The project report contains all the information from the Package report. It additionally contains information for all the project steps as well as statistics according the results of all containing package executions.
Using the context menu of the reports root node, it is possible to change the order of the project steps. It can also be used to run analysis jobs again (if contained in the report).
Subprojects that have been executed separately also have a context menu, from which the sub-report can be opened (provided that the folder structure of the overall report has not been changed by copying/moving files).
Project reports usually consist of at least one *.prf file and one *.trf file per
package. To simplify the exchange of project reports, it is possible to export all files necessary
for viewing the entire report to a project report archive (*.prfz). Unlike simply zipping
the report folder, recordings and log files are not included so that the project report archive is
usually smaller than an archive of the complete report folder. Moreover, a project report archive
can be opened directly like a normal report.
When a project report is opened from test.guide, only the main report is downloaded initially. Additional files are loaded on demand only when they are needed to display the selected elements. This is particularly useful if you are not interested in every test case, as it allows the report to open more quickly.
If you want to avoid short wait times or download reports for later viewing without access to test.guide, you can also right-click on a project element to download all files required to display that element (or the entire report) in advance. If multiple project reports are to be downloaded in this way, pay attention to ensure that the maximum total size under Automatic Report Download from test.guide has been set high enough, otherwise the oldest cached reports will be removed.
Package report
A package report is created when executing a single package (play button in package editor).
Package node (Summary)
The root node of the report contains general information about the package execution:
Packagename
ecu.test Version
Time and duration of execution
Total result, result of the test case and total result of all analysis jobs
Package description
Package file path
Test computer
Tabs with additional meta information of the package execution can be found beneath:
Each of the single tabs is only present if it contains information.
The color of this node represents the overall result of the package execution.
Info
If Git is used as version control system, no URL can be displayed in the report under Information according version control because Git is a decentralized version control system.
Test case
The page test case is automatically selected and shown when the report is opened. It shows a detailed overview of all executed test steps. Called packages are available as child nodes of the test case node. They can be used to limit the view the contained test steps.
The color of this node represents the result of the test case and affects the overall result of the package execution.

The first column shows the test step number and the evaluation. Pale color means, the evaluation occurred somewhere within the subtree; saturated color means this test step caused the evaluation. The assignment of colors to evaluations can be configured in the ecu.test settings.
All columns but the first one can be hidden and shown by means of the context menu that appears when right-clickin the column headings. ecu.test saves the selection of currently shown columns and shows only these columns in subsequently openet test reports. In order to show previously hidden columns, the respective entry in the context menu needs to be re-activated.
Clicking the plus sign in the column Action/Name makes subordinate elements visible. More details of the test step are shown in the details area, e.g. variable values or specified expectations
The details area can be minimized, maximized and unhinged into its own window by using the corresponding buttons.
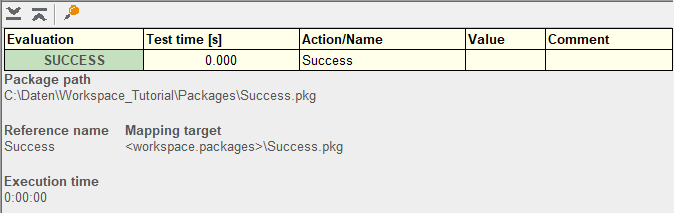
A double click with pressed <Shift> key on any other step opens the corresponding package in the appropriate place in the editor. This allows jumping quickly to an interesting point of the package to make amendments.
A single click on a package call limits the view on the content of the package.
Mapping
Contains detailed information for all mapping items used within the package execution.
If ecu.test is not able to register a variable in the selected acquisition rate, the corresponding columns are highlighted:
- Orange:
Variable could not be registered in the desired acquisition rate. Another acquisition rate was selected automatically.
- Red:
Variable could not be registered in the desired acquisition rate. The use of an alternative acquisition rate is not allowed. All test steps using this variable are rated ERROR.
The origin of a mapping item from local or global mapping is also highlighted.
Info
See also Local mapping and Global mapping
Recordings
Contains all recordings performed during test execution with their contained signals, format information and storage path.
Analysis jobs
Contains detailed overview of all executed trace analyses.
The color of this node represents the result of all trace analyses and affects the overall result of the package execution.
Menu actions

Copy row(s) and copy all lines
In the context menu, ther is an additional option to Revaluate and comment report elements.
Copy row(s)
By means of the option copy active row the contents of a currently selected test report line are copied to clipboard. This can be very helpful for better evaluation of longer texts or Python objects.
The second icon copies all lines of a test report to clipboard displayed, so they can be used in other programs.
Search text
If you enter a search string here, ecu.test jumps to the first place in the test report where that text occurs. The two arrows right and left of the input box allow jumping to the previous or following search result. ecu.test considers all columns except the first two (number and time).
Filter for display
The filter for display helps to determine which steps are displayed. Thus the test report can be filtered at random and edited according to the demands of the user. It is possible, for example, to show only failed steps and steps with the Tag “debug”.
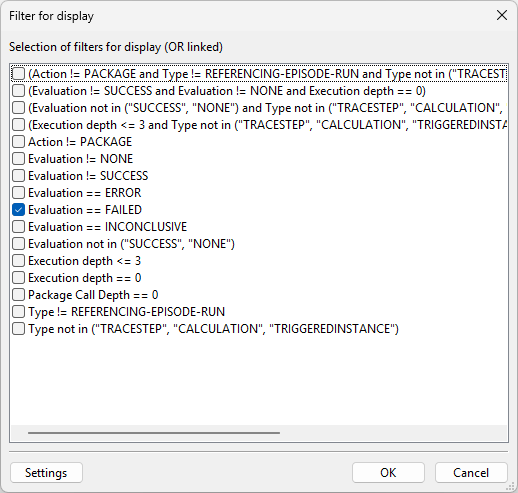
The selected filters have a disjunction, thus either filter condition 1 or filter condition 2 or … For generating filter conditions and links, or for further filter criteria you can click on Settings.
Note: Filter settings are stored in settings and can therefore be used for all packages. You get to settings also via the menu .
Since the filter for display may show test steps whose parents are not shown, the whole test case is displayed as a flat list, without hierarchies.
Expanding and Collapsing
A click on the expand all button shows subordinate elements of all steps.
The button rule-based expansion serves to determine which steps should be expanded. Thus it saves manually clicking many plus signs: Beginning at the root level, all steps that match the chosen filter rule are expanded. The steps made visible by this are then also checked whether they match the folter rule, and expanded accordingly, etc.
The filter rules have the same syntax and semantics as the Filter for display rules.
A click on this button collapse all collapses the subordinate elements in all steps.
Details view
The button layout of detail window allows to set the position of the detail window and to minimize it.
Open report folder
Clicking on button Open report folder opens the explorer with the test report directory.
On the top level there is always the file report.trf – the displayed test report database.
There is a sub-folder for every executed package containing copied recordings, if any. Further folders
may exist which contain generated test reports, for example, in text or HTML format.
Export report to test management system
If ecu.test is configured to use a test management system, this button can be used to transfer the report into the configured system.
Delete report folder
Especially during test development it may happen that you carry out a package and find that parts of it have to be modified or adapted. By means of the button Delete test report directory you can delete the current test report with all its recordings in order to reduce clutter in the test report directory.
Transfer report to test.guide
This button can be used to transfer the test report to test.guide.
Generate test report documents
By means of this button, a document in an arbitrary format (e.g. HTML) can be generated from the report. By default, a report for the whole test case is generated. By selecting the check box “Only for the selected package”, the report will be limited to the package that is currently selected in the project tree of the report.
The existing test reports are configured in the test configuration.
Note: The reports have been configured in ecu.test as plugins. So you have the possibility
to generate quickly further output formats adapted to your own demands. Supplied test reports can be
found in the ecu.test program directory at Templates/Report. Simply copy an existing report
directory and adapt it to your wishes. ecu.test uses the mako framework. Further information and
documentation can be found in the internet at: http://www.makotemplates.org.
Revaluate and comment report elements
A right click on an entry opens a context menu which can be used to manage comments and revaluations for an entry. The accompanying dialog allows creating new comments with or without changing the evaluation. For traceability reasons, editing or deleting existing comments is not possible. Every comment has to specify an author, and a timestamp will be added automatically.
Adding comments allows you to modify the result of the selected entry. Every common result of ecu.test can be selected: NONE, SUCCESS, INCONCLUSIVE, FAILED, ERROR. On top of that every available test management result configured in the Test management settings is selectable as a revaluation result.
The new result will be propagated to the upper levels in the hierarchy up to the overall result of the package and/or project.
The original results are still visible next to the modified results.