Project editor
Projects allow to aggregate several packages. In order to achieve this, various functions have been combined to improve the handling of packages.
It is possible to add different sets of parameter data to a package. The package will then be run exactly one time with each set of parameter data.
Furthermore, it is possible to run several packages after each other. This way, large test runs can be established which are comprised of independent tests and which can execute without any user interaction over a longer period of time (e.g. overnight). Afterwards, a detailed report of all tests is generated.
Projects can be imported and exported with all the necessary data in order to reproduce test runs.

The menu entry creates a new project and opens it in an editor.
Further topics:
Project elements
Packages, project calls and configuration changes can be added as project elements to the project. Adding
is done by drag and drop from the workspace tab into the project window. Configuration changes
(see Configuration change) are added by dragging and dropping configuration files
(*.tcf, *.tbc files).
Alternatively project elements can be added by context menu from workspace tab.
Also, entire folders can be added to the project window, or self-created project folders can be used for a better overview. The package entries generated in the project window just represent references to packages in the workspace tab.
The tree shows the packages and folders added to the project. If there are parameter sets for a project, the package can be extended. Then the existing parameter sets become visible.
Parameter data sets show the value assignation of parameters during package execution. Thus a package can be run in a project several times in a row with different parameter data sets.
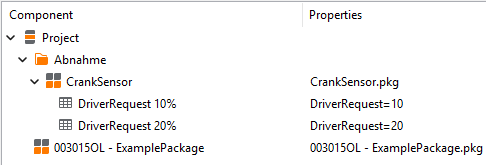
A right click on an element of the project tree opens a context menu:

- Edit
Contains extended options. So it can be determined if the operation of resetting quantities after test execution should be activated, deactivated or handled as in the containing component. The containing component can be a project folder, the entire project or, if specified at the highest level, the test configuration.
In addition, it can be determined if packages should be repeated in case of error/failed. So if specified in the test configuration that execution should be cancelled in case of error, an “error” package can be run in order to re-initialize the test site, for example. Then the package will be run again, and the test report will show only the result of the repeated execution.
In connection with trace analyses the package repetition is handled as follows:
Trace analyses are in principal just executed if the test case does not have to be repeated, be it because the test result meets the expectation or because no retry attempts are made.
If the result of a trace analysis forces a retry, test and trace analysis are repeated at sequential processing. When processing in parallel trace analyses are always executed only once. Their result is irrelevant for deciding if there is a retry or not.
On the project root node and folders it is also possible to configure the random execution mode. If activated, all subordinate project steps are executed in random order during project execution. It is also possible to inherit from superordinated caller(project or folder). Limitation: If the project root node or folder contains configuration change steps on the first level, random execution order is not possible.
If this window is opened for the project root node, an additional tab Attributes is available, which can be used to set a description and additional attributes for the project, just like it is possible for packages. The attributes available for projects are specified in the file
prjattr.spec. Also the test management id (test id) of the project is shown here. Its value can only be copied and not changed (read-only).- Execute from here
Runs all the following packages from the selected position. That makes it possible to re-run just part of a project.
- New
Adds one of the following elements to the project tree:
On right click on the project root:
On right click on a package reference:
 Folder


- Parameterization
Enables the specification of default values in the main project, folders and the parameter set, that are valid in the sub components. Values that are specified deeper in the project tree overwrite the values from upper levels. Mainly the package parameters and global constants can be configured, the parameter set offers more settings.
Info
In contrast to the parameter set, *.ppd files referenced here (or on project folders) may define parameters which are not present in called packages without leading to an error.
Info
When setting a value for a global constant, which was set at runtime previously, then its runtime value is reset. In subsequent elements, the value defined at the parent node applies if there is one. Otherwise, the global constant is consiered as not defined anymore.
- Activate
Determines if the element in question is to be executed. That allows easy deactivation of individual elements without modifying the whole project.
- Report
Determines if a test report should be prepared for the package. If this option is deactivated, the package will be executed but no details can be seen for evaluation.
The options , , , and correspond to the familiar standard functions.
Package reference
Package references can be added to a project by right click and selection of or by taking them from the package tree by means of drag and drop. Thus, several packages are run after each other and displayed in a large test report which also contains statistical information about the number of “SUCCESS”/”FAILED” elements.
There are different types of package references. Besides normal package references  ,
there are also stimulation packages
,
there are also stimulation packages  and analysis packages
  .
The latter two combined form a special workflow, which is described in chapter
Stimulation package and analysis package.
.
The latter two combined form a special workflow, which is described in chapter
Stimulation package and analysis package.
A right click on a package reference serves to open the package for inspection (like by means of shift + double click) or to add a parameter set/parameter generator (menu item ). By means of clicking on properties, different options can be determined:
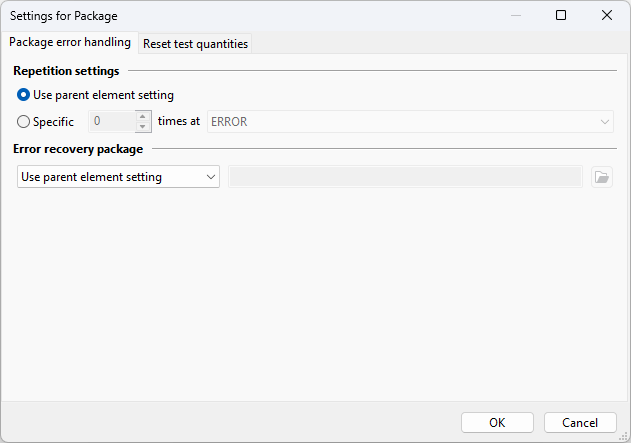
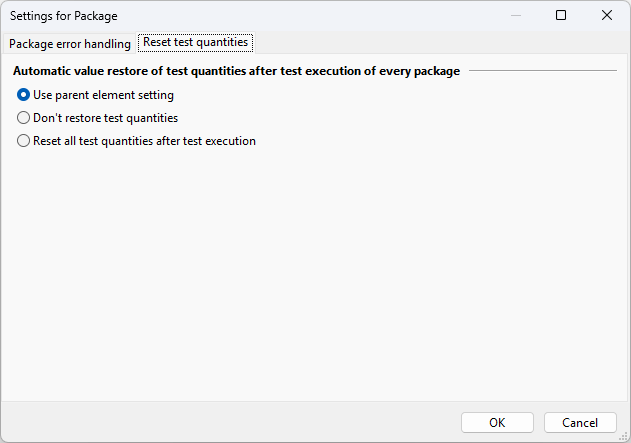
The tab Package error handling allows for the automatic repetition of a package if the evaluation was ERROR or FAILED. Together with the possibility of specifying a package here to be executed in case of abort, ERROR or FAILED, we have an efficient tool, in case of problems, for getting the test site into a defined state. The settings correspond to those in the test configuration but they can be determined here specifically for each reference. The same setting is also available for project folder, the project root node, project calls, and parameter sets. When configured at such a node, it affects all contained package references, or in the latter case, the single parameterized package execution.
The tab Reset test quantities also corresponds to configured settings and can be specially activated or deactivated here.
Parameter set
Parameter sets can be used to parameterize package references in a project. A package reference can contain zero or multiple parameter sets. If no parameter set is defined, the package will be executed once with its corresponding default values. If one or more parameter sets are defined, the package will be executed once per parameter set, passing the appropriate parameters.
A double click on a Parameter Set opens the following dialog:

In the tab Parameterization the package’s parameters can be overwritten. In the upper part
parameters can be assigned statically. In the lower part package parameter definition files
(*.ppd, parameter definitions for details)
can be referenced. Parameters from both sources, statically defined and *.ppd files
have to exist in the package or the execution will result in an error.
Parameters that are not overwritten here will be assigned their default value.
Info
The order of the files in the list influences the evaluation priority of the parameters. I.e., if the same parameter is specified in two different files but with differing values, the final value will be the one from the file that is topmost. Parameters that are defined statically in the upper part of the window are represented by the entry <statically defined entries> and they are prioritized according to its position.
The Mapping tab allows to manipulate the mapping entries of the referenced package. Using this feature, it is possible to execute the same package several times with different parameter sets while manipulating different mapping targets on each run. Additionally, mapping items from the global mapping can be defined as mapping targets using drag-and-drop. By changing the target of these references in the global mapping, it is possible to adjust targets of quantities within the called package without the need of modifying the parent project itself.
In the tab Signal recordings new recording groups can be defined temporarily for the package’s signal groups.
The Global constants tab can be used to influence the values of global constants in the package. On the one hand this enables defining new global constants that are not part of the currently started test configuration. On the other hand the values of already existing global constants can be overwritten. Furthermore, constants definition files can be referenced as described in the section Constants definition editor.
Info
Manipulating or defining global constants will always only effect the appropriate instance of a package run. It has no side effects on following runs.
In the tab Attributes the values of package attributes can be set. It also allows for attributes already defined in the package to be overwritten for the parameter set.
After the test execution, the test report will show the different parameterizations that were used for each package run. An example can be seen in section Evaluation.
Project reference
By means of right-clicking on an element of the (main) project and choosing , an existing project can be added to that project as a reference. Adding as a reference means there will only be a link to the existing project so that all modifications made to the reference will occur also in the main project.
By means of right-clicking on a project reference and choosing properties, in addition to general properties that can be set also for packages, the following execution options can be chosen.

Execute subprojects separately
“Separate” refers here mainly to the project report: with the default setting, all project elements are put in a single project report. If that option is activated, the project reference gets its own project report that is saved in a separate subfolder. The test report of the main project will only show the overall result. This property can also be set on the project root node or on project folders. In this case it applies to all contained project references without a setting of their own. The folder name is then generated automatically.
If a separate subproject execution was configured, it is possible to configure the abort behavior. If the execution of the subproject is aborted or ended by an Exit test step, it can be decided whether the complete project execution shall be cancelled or only the subproject execution is cancelled and the project execution goes on with the next project step. This behavior can also be inherited by a parents element setting.
Info
A manual user abort always leads to a complete project execution termination.
Random execution order
The project elements contained within this project are executed in a random order. This behavior can also be inherited by a parents element setting.
Info
Configuration changes are prohibited within projects with this execution option activated.
Parameter generator
The generator is assigned to a package within a project and creates sets of parameters during runtime. The parameter sets are generated one by one and carried out with the package immediately. After execution the return parameters of the package can be accessed. The values of the parameters can be used to control further generation. That represents a very flexible tool for carrying out, on the one hand, packages with a large number of parameter sets and saving the parameters in an external file for example Microsoft Excel, on the other.
In case it is necessary to save the parameter sets, it is possible to use the generator to create a copy of the project with all the generated parameter sets instead of the generator node. This can be done by selecting from the generators context menu.
Info
The parameter sets are only generated and not executed when using the static generation.
Advice for creating a parameter generator can be found in section Parameter generator for projects of chapter Extensions.
In order to use the generator in a project, you right-click on a package reference and choose , then and then the name of a generator. It is also possible to apply several generators on one package, where the generators will be used sequentially.
Parameter variation
The parameter variation is a special parameter generator. The parameter variation provides an easy way to combine the values range of different parameters. This helps, if you want to check a test case with many parameters, that have many different parameter values.
Notation of the Parameter Values
Supported parameters have the type Numeric, String, Enum or Texttable. Parameters of type String, Enum and Texttable have to be used in quotes, e.g. “A”.
Parameter values are entered using following notations. Be aware that parameters of type String, Enum and Texttable can only be used in lists.
- List
Arbitrary values can be given and selected by a comma.
Example
23, 42, 77 or “A”, “B”, “C”
- Stepwise
The parameter can be defined over a range with a given step size. Following syntax must be used start(step)stop. Step defines the step size, start and stop are inclusive.
Example
10(5)20; Following parameter values are tested: 10, 15, 20
- Equivalence class partitioning
You can define equivalence classes with the notation [start:end]. With the equivalence class notation the limit values and one value within the interval are tested automatically.
Example
[-30:0],[0:50]; Following parameter values are tested: -30, -29, -15, -1, 0, 1, 25, 49, 50
Info
Equivalence class partitioning can only be used with integers.
Algorithms
For combining the parameters following algorithms could be selected:
- Cartesian Product
This algorithm create the parameter sets for all possible parameter combinations. The parameter space is completely covered by the specified parameter values.
Caution
The parameter space grows exponentially with the number of the parameters and their concrete values.
- Classification Tree Method
This algorithm create parameter sets, such that every parameter value is at least tested once.
With this method only errors could be detected, that depend only from one parameter value. In return the number of the parameter sets is much less compared with the Cartesian Product.
- Pairwise Method
This algorithm extends the Classification Tree Method, such that all combinations of two parameter values are tested.
This method lies between the Classification Tree Method and the Cartesian Product in terms of parameter space coverage and the number of generated parameter sets.
- N-wise Method
This algorithm generalizes the pairwise method, such that all combinations of n parameter values are tested.
Limit of parameter sets
It is possible to set a maximal limit for the generated parameter sets. If the given limit of parameter sets is reached during generation, the generation will be stopped.
When using the option random, parameter sets are randomly selected from the entire result set, until the limit is reached. Under :menuselection:’advanced settings’ the method of the random generator can be set:
- non-deterministic
A new, random result set is selected for each test run. The test result is therefore also not deterministic.
- deterministic
For each test run, exactly the same, random result set is selected for a given seed (pseudo-random). The seed can be used to vary the result set.
Numbering of parameter sets
The numbering of the parameter sets can be switched on or off. If numbering is switched on, each parameter set is given the name of the package with a sequential number after it. If numbering is switched off, all parameter sets are given the name of the package.
Package generator
The generator is created directly on the project root by using the options and the desired generator in the context menu. On execution of the project, the generator subsequently generates packages and executes them. These packages are not stored persistently to the file system, thus they are not accessible after execution anymore.
In case it is necessary to save the packages, it is possible to use the generator to create a copy of the project with all the generated packages referenced instead of the generator node. This can be done by selecting from the generators context menu.
Info
The packages are only generated and not executed when using the static generation.
Advice for creating a package generator can be found in section Package generator for projects.
For a qualitative signal comparison of different trace files the Reference test package generator can be used.
Project generator
Project generators can be used for dynamically creating projects during project execution, based on a script. Advice for creating a project generator can be found in section Project generator.
The generator is created on a project root node or a project folder by selecting and the respective generator in the context menu.
When the project is executed, projects are generated and executed. The projects are not persisted in the file system. Thus, they are not available for a repeated execution.
In case it is necessary to save the projects, it is possible to use the generator to create a copy of the project with all the generated projects referenced instead of the generator node. This can be done by selecting from the generators context menu.
The built-in workspace filter generator generates projects based on defined Filter.
Info
The projects are only generated and not executed when using the static generation.
Configuration change
With the project step “Change configuration”, the test and test bench configuration can be changed, started and stopped, for example to switch between different test bench or test object configurations. Within a project, any number of “Change configuration” steps can be used.
In addition, the project step allows to change the state of the tools in the used configuration independently, i.e. to start, stop or restart the tools individually. With multiple successive “Change configuration” steps, customized startup and shutdown sequences can be realized.
This project step offers the following options:

Info
If a change configuration step is inserted in the project, a possible parameterization of the project or a folder will overwrite the settings of the new loaded configuration.
Dropdown Action
The dropdown can be used to select if the chosen configuration will be started (resp. changed), restarted or stopped.
Checkbox and input field test configuration
If the checkbox is set, the test configuration to be used can be specified here. In this case, if the input field is left blank, the current configuration will be stopped (if started) and deselected. When the test configuration is changed, the new configuration is – if possible – adopted without reloading the databases or restarting all tools of the test bench configuration. This behaves in the same way as with manual selection of the configuration (see Selecting a configuration for use). In contrast to the manual selection, however, no dialog is shown to avoid blocking the project execution. If the checkbox is not set, the currently selected, possibly started, test configuration is used.
Checkbox and input field test bench configuration
If the checkbox is set, the test bench configuration to be used can be specified here. In this case, if the input field is left blank, the current test bench configuration will be stopped (if started) and deselected. If the checkbox is not set, the currently selected, possibly started, test bench configuration is used.
List of tool actions
For each tool of the test bench configuration, the action during the configuration change can be specified here. Available tool actions:
Automatically (default): If TBC or TCF are changed in the Change configuration step, the Tool is stopped during the configuration change and then restarted if necessary. The restart depends on the start mode defined in the Test bench configuration editor and on references to one of the tool’s ports in the Test configuration editor. If TBC and TCF are not changed, the tool remains started.
(Re-) start: Tool will be started if it is stopped. In case it has already been started, it will be restarted.
Start (no restart): Tool will be started if it is stopped (gray) or in error state (red). In case it has already been started (green), it will remain started. This is only possible, if the test bench configuration is not altered in the “Change configuration” step.
Stop: Tool will be stopped or remain stopped.
None: No action will be performed on the tool.
Info
The priority assigned to the tools in the test bench configuration and the resulting start and stop order of the tools are applied in the following cases:
The selected but not yet started configuration is started.
By changing the test or test bench configuration, the currently active configuration is stopped and then the new configuration is started.
The option to force a restart of the configuration is set.
In all other cases the start and stop order of the tools are not defined.
Project editor toolbars
Main toolbar
The main toolbar groups common project actions into compact functional areas.

Main toolbar in the project editor
- Project execution
The execution area starts regular and interactive project runs and gives access to execution variants, for example without trace analysis. For more details, see the sections Execution and Interactive execution.
- Check Project
Checks the consistency of the project, for example, whether all referenced packages exist. See also Check project.
- View and editing
The view area controls expansion states of project steps. The editing area provides standard operations for existing steps, such as cut, copy and paste.
- File operations
File actions create, open and save projects, including saving a project as a template.
- Project filter
The filter field applies the Project Filter directly in the editor.
Project element toolbar
The project element toolbar on the left provides quick insertion of project elements.
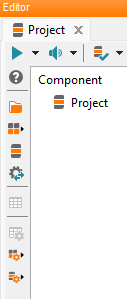
Project element toolbar for inserting project elements
Depending on the current context, one can insert folders, package and project references, configuration changes, parameter sets and generator elements. The detailed concepts are described in Package reference, Project reference, Configuration change, Parameter set, Parameter generator, Package generator and Project generator.
Import and export
A project can be imported or exported via the menu or .
If a project is exported to an archive, all elements needed for project execution are packed into a file. That regards all referenced packages and projects (including the relative list structure) as well as the utilized test and test bench configurations and, of course, the project file itself.
Info
Artifacts originating from a library workspace are not included in the project archive.
If such a project archive is re-imported, the elements are added again to the ecu.test lists. If files already exist, user will be asked for aborting or overwriting workspace content. The test and test bench configuration of the imported projects generated with importing can be selected according to Using configurations.
Filter packages
By entering filter expressions in the text control in the Main toolbar it is possible to filter Package references in the current project according to their name and the attributes defined in the referenced packages. The filtered packages will not be executed. An auto completion assists when entering filter expressions. Since all package attributes are strings, the comparative value also has to be a string, inserted in apostrophes.
Searching for the Name of a package reference
"Testcase123" --> ["Testcase123"]
"Testcase1?3" --> ["Testcase123"]
"Testcase*"   --> [Testcase123, Testcase236, Testcase366, Testcase499]
The extended filter language is defined in section Filter in detail.
Execution
Project execution is started via the symbol  in the Main toolbar
above the loaded project or by means of the context menu . Now
ecu.test executes one by one the packages entered including their parameters, if any, and creates
corresponding test reports. During execution the project window shows the results of the projects
already done. So you have a continuous survey of the progress of project execution.
in the Main toolbar
above the loaded project or by means of the context menu . Now
ecu.test executes one by one the packages entered including their parameters, if any, and creates
corresponding test reports. During execution the project window shows the results of the projects
already done. So you have a continuous survey of the progress of project execution.
By means of the black arrow next to the symbol of the project execution you can choose to execute the project with or without the trace analysis. It is also possible to execute the analysis jobs in a parallel instance.
Run project (test case + analysis jobs)
Run project without executing analysis jobs (only test case)
Run project and execute analysis jobs in parallel (test case + analysis jobs in parallel instance)
Run/continue selective execution of project
Run/continue selective project execution without analysis job execution
Run only trace analyses (only analysis jobs)
Run only trace analyses in parallel (only analysis jobs in parallel instance)
For the parallel execution an additional ecu.test instance is run in the background to execute the analysis jobs.
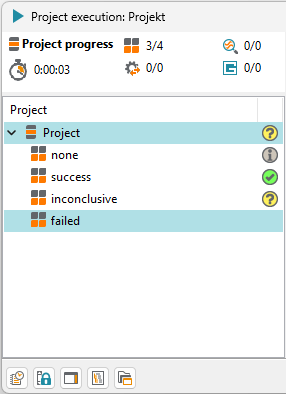
The left region of the execution dialog shows the project elements and the current progress of execution. The middle and right part of the dialog which show the package execution progress are described here.
During execution, buttons to skip the current project element, to abort after the current element and to abort immediately, are shown at the bottom of the dialog.
After the execution finished, the buttons are replaced by buttons to open the test report and to close the execution dialog.
Info
The overall result displayed during project execution corresponds to the complete project, not only to the current package and is updated after the package run.
Info
The button to deactivate automatic scrolling also affects the overview of project elements during project execution.
Interactive execution
The project will be executed in interactive mode by clicking the symbol  . Packages
that contain test steps that are marked as interactive will be executed in the view for user
interaction. Further information are available in chapter
Interactive testing.
. Packages
that contain test steps that are marked as interactive will be executed in the view for user
interaction. Further information are available in chapter
Interactive testing.
By means of the black arrow next to the symbol of the interactive project execution you can choose to execute the project with or without the trace analysis. It is also possible to execute the analysis jobs in a parallel instance.
Check project
The command invokes a check of the current project and all containing packages, generators and subprojects.
For user-defined generators the Check() method is called, were the generator can return a text that describes any problems that exist.
Any subproject and its subprojects are checked recursively.
Info
It is also possible to implement your own project checks. These custom checks create the
possibility to also offer your own fixes in a context menu which can be applied directly in the
same check dialog. For this purpose the supplied examples can be copied into the workspace when
starting ecu.test.
The interface is included in the ecu.test Interface Python Library
ecutest-interface.
Custom project checks can be placed in the workspace below UserPyModules,
so that they are recognized by ecu.test.
A complete overview is available in Custom checks.
Evaluation
After completed project execution the evaluation is opened in Report viewer by clicking on the button Report.
Info
As mentioned previously in section Parameter set it is possible to parametrize package references through parameter sets. Each modification by a parameter set can be looked up in the corresponding project step’s detail report. This overview contains defined parameters and global constants including additional constant definition files.
A detached “(Default)” tells whether a package parameter has been overwritten or not. This addition means, that the corresponding parameter has not been overwritten and the default value has been used.