Tutorial Keyword-Based Testing
This tutorial provides an overview of the possibilities of keyword-based testing that ecu.test offers.
The sample data used in the tutorial is delivered with ecu.test. How the sample data can be
integrated into a workspace is described here. The files for this
tutorial can be found in the subfolder Tutorial-KeywordBasedTesting.
The following two approaches enable keyword-based testing:
Basiscs of Keyword-Based Testing
One of the core features in ecu.test is the use of Package references, i.e. packages being able to call other packages. This enables the encapsulation of special test sequences that can be reused in numerous test cases. Several such helper packages can be combined into libraries, which increases maintainability and ensures clean structuring of test cases.
Info
This concept is to be distinguished from Library workspaces. The library packages refered to here are located in the same workspace as the calling packages.
Keyword-based testing is based on the library packages. Keywords can be used to specify test cases that are universally interchangeable, as they all use the same language. Each keyword describes an input variable (parameter or signal). The keyword thus forms an interface between the test case specification and the implementation.
Keyword-based testing can be realized in ecu.test within the scope of Package references and with the help of mappings.
Alternative package representation
ecu.test offers the possibility of assigning an alternative call representation in the mapping of a package, which can use placeholders. There are two types of placeholders:
With
${Parameter.MY_PARAM}the values of parameters in the referenced package can be accessed.With
${Mapping.MY_SIGNAL}the mapping names of the mappings in the referenced package can be accessed.
The parameters and mappings can be used to write packages generically and to call them with different signals and parameters. To ensure that the placeholders are resolved correctly, all referenced variables must be parameterized correctly in the package call. The name of the test step then corresponds to the scheme <name of the mapping>: <alternative display name>, whereby the placeholders are replaced by the parameterized values. Placeholders that cannot be resolved do not lead to an error message, but aren’t replaced either.
A tutorial on the topic of alternative package representation can be found under Tutorial Keyword-Based Testing.
Package Return Values
Expectations can be defined for the return values of a referenced package. These are then evaluated in the calling package. If all return values correspond to their expected values, the result of the package call will be SUCCESS. If at least one return value does not meet the expectations, the library package is evaluated as FAILED.
The evaluation of the return values can also be linked to time conditions.
Descriptive package calls
Motivation
As a tester, I would like to create a library of generic test sequences that I can reuse flexibly in my test cases. I also want the test steps to be formulated as closely as possible to my specification.
Creating a generic reference package
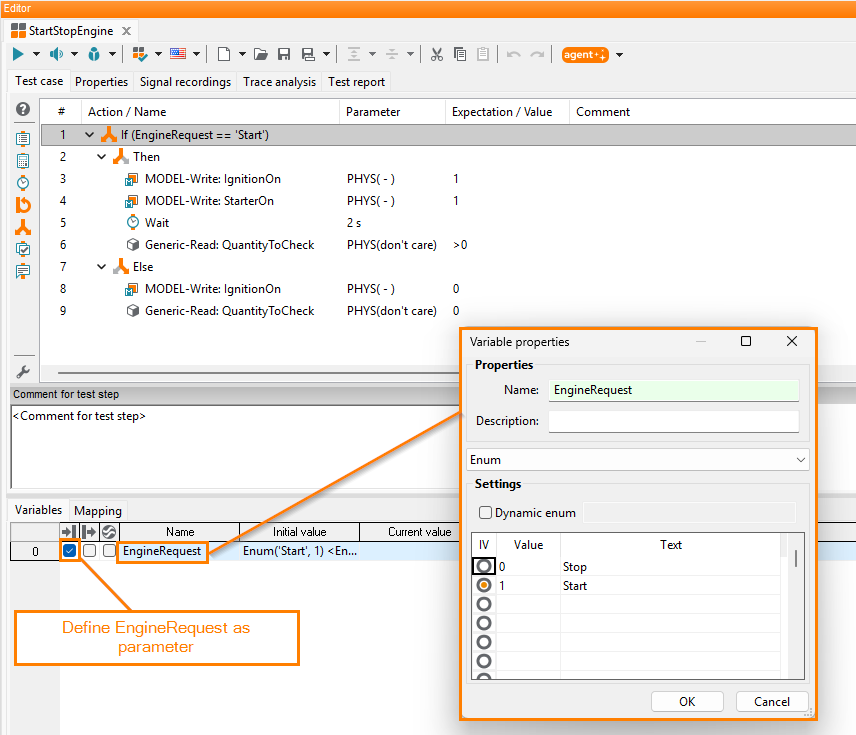
First I create my library package StartStopEngine.pkg, which starts or stops my engine
and checks the success by means of a signal of my choice. I would like to flexibly specify
whether I want to start or stop and which signal I want to use to check the success. To do this,
I create a parameter EngineRequest of type Enum with the values
‘Start’ and ‘Stop’:
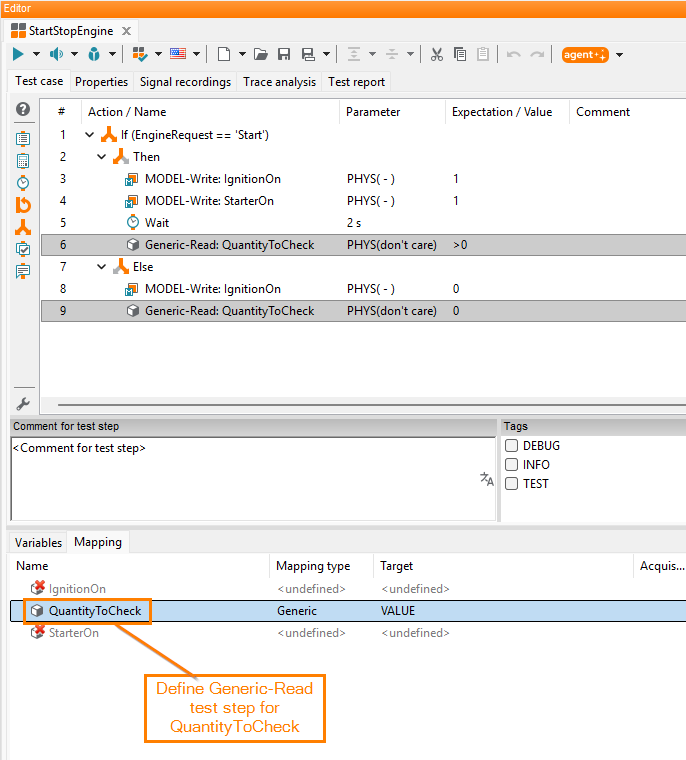
For reading an arbitrary signal, I add a generic reading test step with
the mapping name QuantityToCheck. As the evaluation, I specify that the measured value
should either be greater than 0 (when starting) or equal to 0 (when stopping):
Using a reference package with a descriptive name
Now I would like to use my reference package StartStopEngine.pkg
in a test case Testpackage.pkg. The first call should start the engine and the successful
start should be checked using the VehicleSpeed signal. In the second call, the engine is to
be stopped and the success checked using EngineSpeed. Also, I want to be able to
differentiate between the two package calls more easily and to recognize from the display name
how my library package is parameterized.
To achieve this, I first need to create a mapping entry for my library
package StartStopEngine.pkg. This is possible both in the
Global Mapping as well as in the
Local Mapping of the calling package (here: Testpackage.pkg).
For the purpose of this tutoral, I create an entry in the global mapping. In the mapping edit
dialog, I can then assign a Alternative Call Representation. This alternative call
representation can reference the values of the parameters and mappings of the referenced package
StartStopEngine.pkg. The notation is ${Parameter.My_Parameter} for parameters and
${Mapping.My_Mapping_Entry} for mappings, respectively:
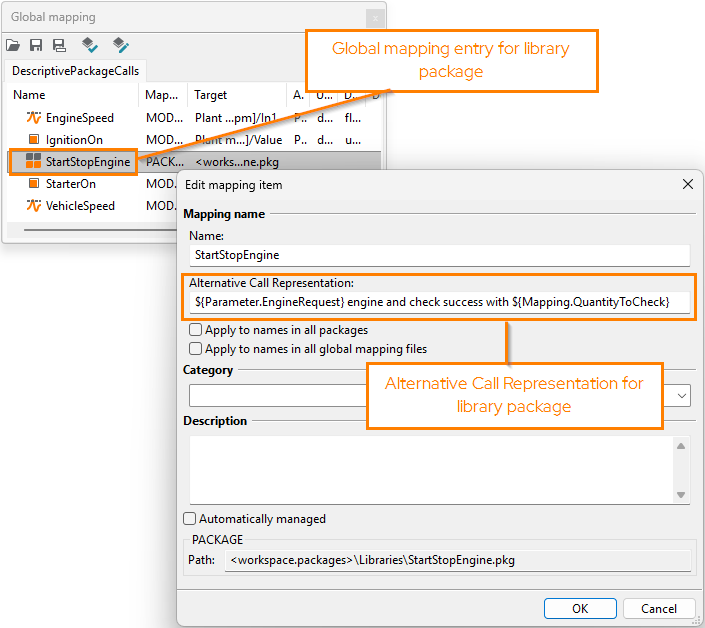
For StartStopEngine.pkg, I referenced EngineRequest with ${Parameter.EngineRequest} and
QuantityToCheck with ${Mapping.QuantityToCheck}. Their values will be replaced once I insert
the mapping entry into Testpackage.pkg and parameterized the package call.
Next, I drag the package mapping into my Testpackage.pkg and parameterize it as desired:
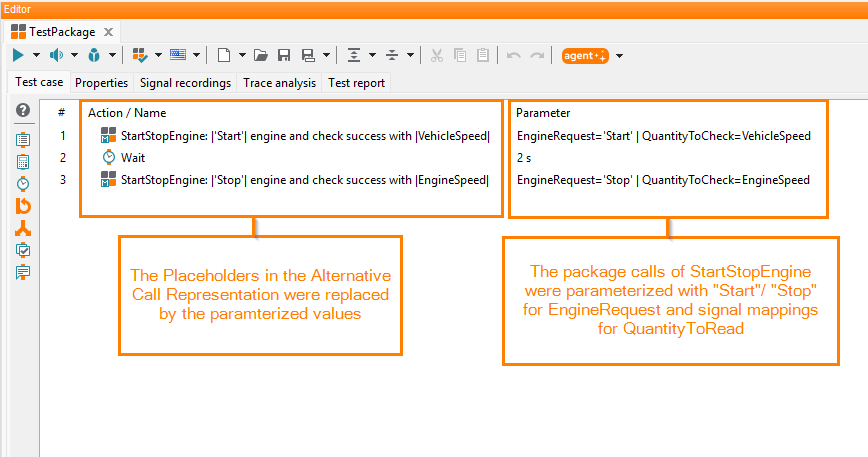
The display name of my reference package StartStopEngine.pkg in Testpackage.pkg now also
contains the alternative call representation with the parameterized values. I can see at a
glance what my package call will be doing.
Evaluation of the return values of library packages
Motivation
As a tester, I would like to create a library of generic test sequences that I can reuse flexibly in my test cases. Part of the library packages generate internal return values. I would like to evaluate these directly in the package call.
Create library package with return values
I use the package StartStopEngine.pkg from the tutorial
Descriptive package calls as a template. This package
starts/stops an engine model and checks the success of the start/stop by reading a signal that
I specify. However, instead of evaluating the result of this signal directly within my library
package, I store it as a Return value QuantityToCheckResult:
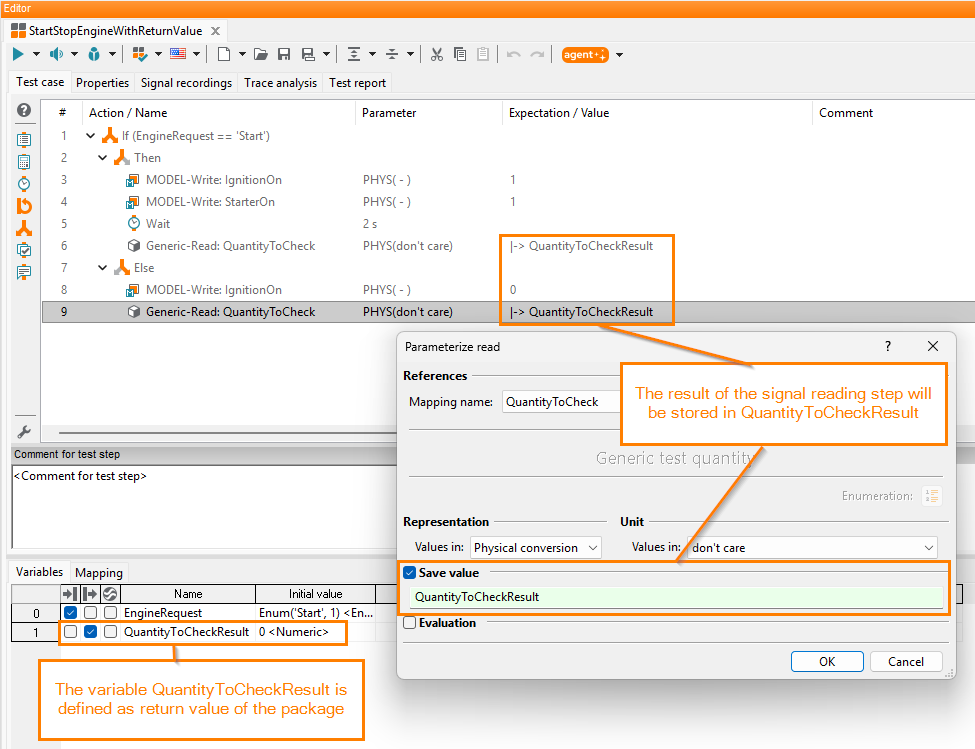
Evaluation of the return value
I then create a new package TestPackageWithReturnValueEvaluation.pkg, in which I call
StartStopEngineWithReturnValue.pkg. I parameterize the call so that my engine model is
started and the signal EngineSpeed is used to check whether the start was successful.
As I have specified the return value QuantityToCheckResult, it is displayed in the tab
Parameterization of the Parameterization of package dialog. Here, I can
also specify my Expectation and set it to “>0”:
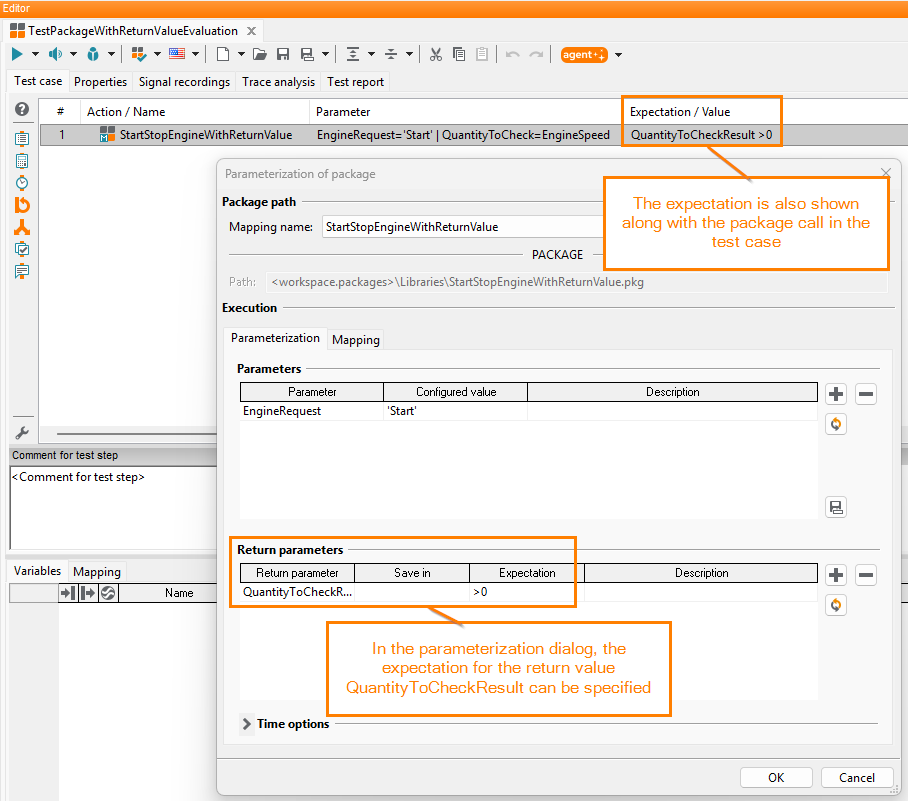
When I execute TestPackageWithReturnValueEvaluation.pkg, the call to
StartStopEngineWithReturnValue.pkg is evaluated based on my expectation and I can see all
the necessary information at a glance:
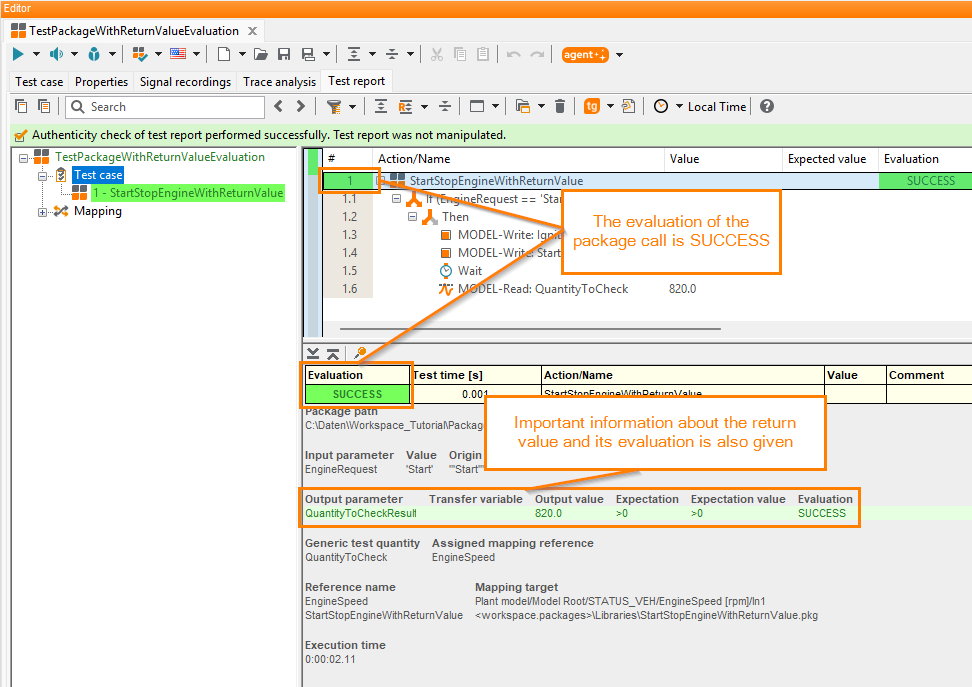
Use of time options to evaluate the return value
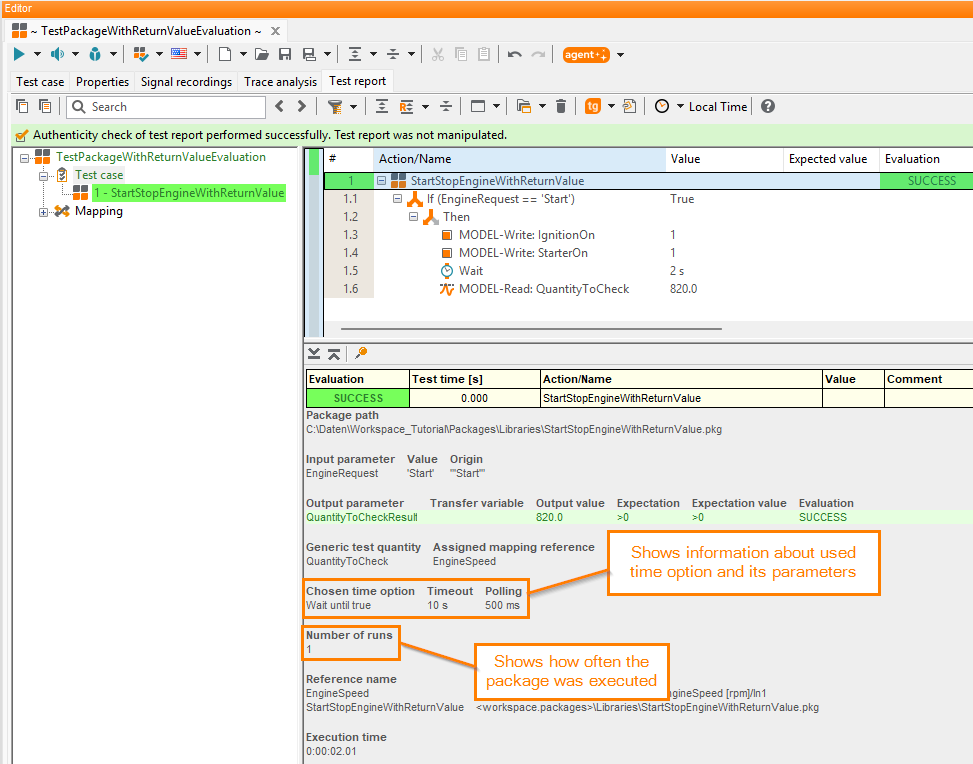
The evaluation of the return value can also be linked to time conditions. To do this I expand the Time options panel after setting the expected value. With the option Wait until true I specify that the expected result must occur within a certain time. I set the Timeout to 10 seconds and the Polling cycle to 500ms, whereby the package is executed every 500ms until either all expectations have been fulfilled (success case) or not all expectations are fulfilled and the timeout of 10 seconds has been reached (error case).
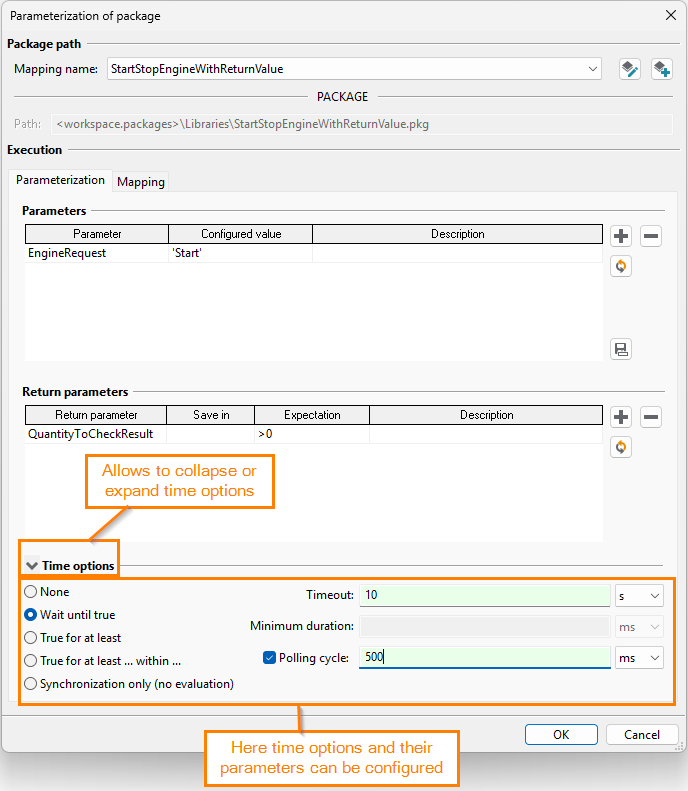
By using the time options, I receive additional information on the used time option and the number of runs in the test result details.
A detailed description of all time options can be found in chapter Time options.