User interface
This category outlines test steps serving for user interaction.
Info
These test steps, with the exception of the Image dialog test step, cannot be used when test execution is performed with the ecu.test Runner, because they require user interaction, which is not possible with the ecu.test Runner.
In this case, the test steps are evaluated as ERROR in the report.
Select list
This test step provides the user with a selection dialog while the program is running and asks him to select a certain number of elements.
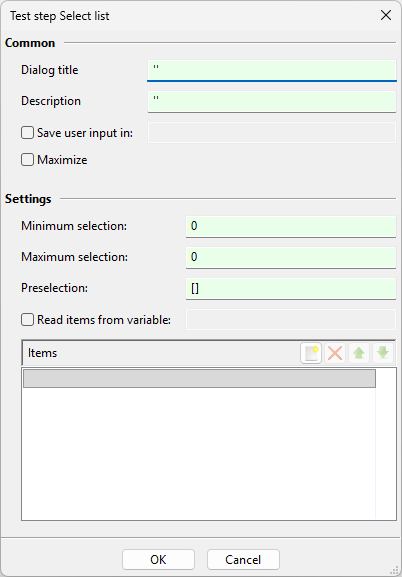
Dialog title specifies the title of the window shown (text or variable).
In the next line a Description (text or variable) can be displayed to the user.
Save user input in specifies the name of the variable in which the elements selected by the user will be saved as a list.
Maximize determines whether or not the dialog should be displayed full-screen.
Minimum and maximum selection specifies the smallest and the largest number of elements the user has to select. If both numbers are 0, an arbitary number of elements can be selected.
Preselection ensures that the elements specified will be pre-selected. The user can modify that selection during test execution. The elements for preselection are defined as a list of values or indices. Integer inputs in the preselection are evaluated both as list index and as element value. For example, the preselection “[0]” selects both the first element of the list and the numeric value “0”, if it exists.
Read items from variable serves to read indicated elements from a variable while the program is running. For that purpose the variable must contain the elements in the form of a list.
As an alternative, the elements can be entered directly. The first button serves to create a new element. The second button deletes a selected element, and the arrows serve to rearrange the elements. Possible inputs are strings (in apostrophes) or variables.
Image dialog
This test step displays an image.
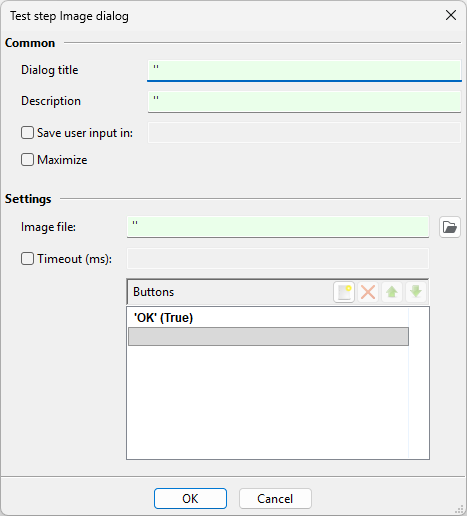
Dialog title determines the title of the window shown (text or variable).
In the next line a Description (text or variable) can be displayed to the user.
Save user input in specifies the name of the variable in which the button pressed by the user will be saved.
Maximize determines whether or not the dialog should be displayed full-screen.
Image file indicates the name of the image (including path) that is to be displayed (text or variable). The select button serves to choose a file directly on the hard disk.
Timeout specifies the time in milliseconds after which the dialog will be closed automatically with the standard button (always the first one, shown in bold).
In the window below the buttons displayed can be arranged. A click on the first symbol opens a dialog for arranging a new button. Here it is necessary to enter the labeling (Identifier) and the Return value (= value which is to be saved in Save user input in when the button is pressed). Inputs are possible as value or variable. The following symbols serve to delete or re-arrange buttons. They can be edited by double click.
Input dialog
This test step provides a dialog by means of which the user can make various inputs.
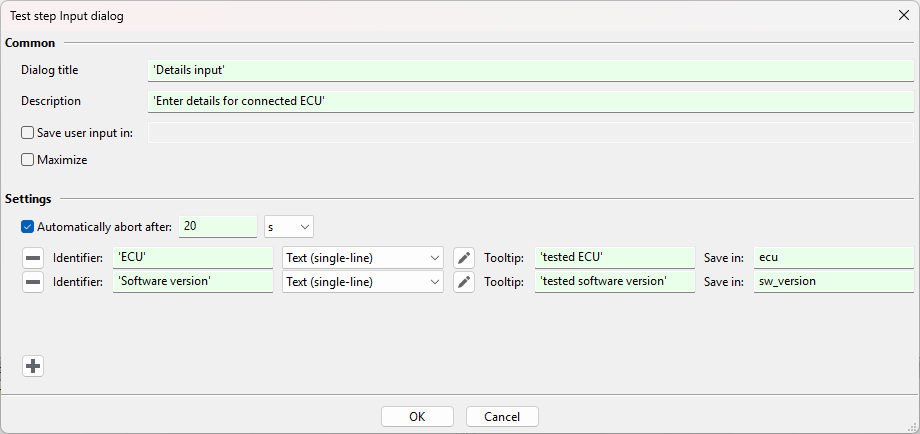
Dialog title determines the title of the window shown (text or variable).
In the next line a Description (text or variable) can be displayed to the user.
Save user input in specifies the name of the variable in which all inputs are to be saved in a list.
Maximize determines whether or not the dialog should be displayed full-screen.
Automatically abort after determines an optional timeout after which the test step will be aborted.
Different input fields can be arranged below. The first (red) symbol serves to delete an input field. It is active only if there are at least two input fields. New input fields can be added by means of the green symbol below. The field Identifier serves for entering the label of the input field. After that the input type is chosen (selection, single-line, multi-line,…). By means of the following symbol it is possible to determine specific settings, e.g. standard text. A tool tip appears when the user moves the mouse over the input field. Save as suggests the name of the variable in which the input is to be saved. Text (in apostrophes) or variable inputs are possible in the fields Identifier and Tooltip.
Infoblock
Showing a dialog (also referred to as runtime dialog) with user-defined, possibly changing content while child test steps of the Infoblock are being executed. The dialog’s appearance can be customized as far as possible using HTML markup. This allows embedding of images and hyperlinks.
The contents to be displayed in the Infoblock are entered in the field Display text of the test step dialog. Python expressions, such as test case variables, can be included in curly brackets. Changes to these variables by test steps within the Infoblock are reflected by the display, since the runtime dialog is periodically updated.
The runtime dialog is automatically closed as soon as test step execution leaves the Infoblock. Abort buttons for manual abort of the Infoblock (or the whole test case) can be optionally added to the dialog. Furthermore automatic abort can be enabled by specifying a time out.
If an Infoblock does not contain any child test steps a button Next is shown in the runtime dialog. Execution will be suspended until this button is pressed.
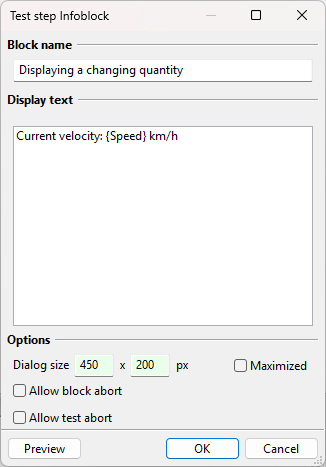
Block name defines the runtime dialog’s title (text only)
Display text specifies the text to be displayed and periodically updated in the runtime dialog. HTML markup is supported. For example, line breaks are represented as “<br>”. Python expressions are entered in curly brackets.
Dialog size defines the runtime dialog’s size (Width by Height in pixels).
Maximized sets if the dialog is shown maximized.
Allow block abort shows or hides the button for manual abort of the block.
Automatically after activates automatic abort of the block on a user-defined time out in seconds.
Allow test abort shows or hides the button for manual abort of the whole test case.
Examples (find corresponding Display text setting below the respective screenshot):
- Unformatted display of a changing variable value:
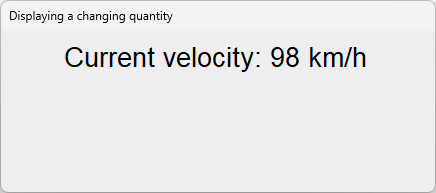
Current velocity: {Speed} km/h
- Formatted display of a changing variable value:
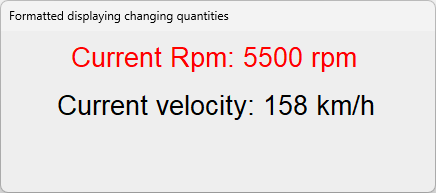
<font color="{getRpmColor(Rpm)}">
  Current Rpm: {Rpm} rpm
</font>
<br>
<br>
Current velocity: {Speed} km/h
- User request with embedded image and hyperlink:
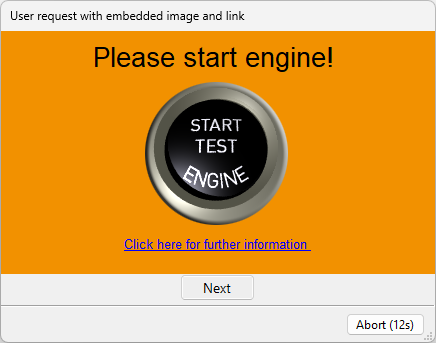
<html>
  <body bgColor="#F29100">
    <center>
      <div>
        <font size="24">
          Please start engine!
        </font>
      </div>
      <div>
        <img src="Packages\User Feedback\InfoBlockDemo.png">
      </div>
      <div>
        <a href="http://www.tracetronic.de">
          Click here for further information
        </a>
      </div>
    </center>
  </body>
</html>
Message dialog
This test step shows the user an information, question, warning or error. The user has to close the display by one of the buttons. During that time execution is halted.
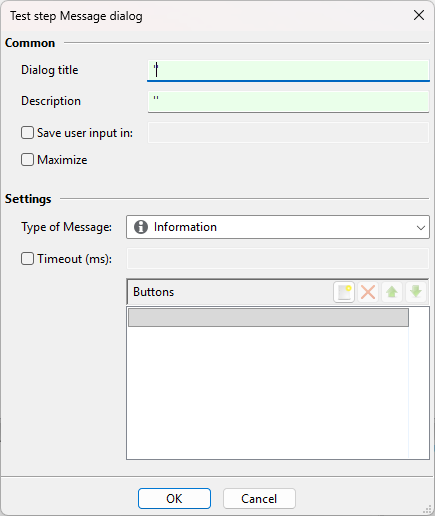
Dialog title determines the title of the window shown (text or variable).
In the next line a Description (text or variable) can be displayed to the user.
Save user input in specifies the name of the variable in which the button pressed by the user will be saved.
Maximize determines whether or not the dialog should be displayed full-screen.
Type of message specifies the type of message - information, question, warning or error
Timeout specifies the time in milliseconds after which the dialog will be closed automatically with the standard button (always the first one, shown in bold).
In the window below the displayed buttons can be arranged. A click on the first symbol opens a dialog for arranging a new button. Here it is necessary to enter the labeling (Identifier) and the return value (= value which is to be saved in Save user input in when the button is pressed). Inputs are possible as value or variable. The following symbols serve to delete or re-arrange buttons. They can be edited by double click.